Cotehardies: Cutting and Fitting the Grand Aissiette
by Ken Nye (writing as Edward Newman)
The outstanding feature of the fourteenth century pourpoint worn by Charles of Blois (fig. 1) is the extraordinarily large armhole (grand aissiette) and sophisticated cut of the sleeves (fig. 2). The unusual shaping and many gussets allow an astonishing range of movement to the arms. Clearly, this was an advantage when the padded pourpoint was worn under armour. As short costume developed and the cotehardie was influenced by what had previously been an undergarment, the practical gusseted sleeve was retained and continued in use (fig. 3). As the fashionable silhouette changed in the fifteenth century, fitted sleeves with both shoulder width and ease provided by a puff of fabric at the top replaced the grand aissiette (fig 4).
I spent ages making padded doublets with carefully graded layers of cotton batting in the attempt to create the characteristic rounded chest of the late 14th century before I discovered that an ordinary bath towel, folded in half and then again diagonally provides exactly the right shape (fig. 5). If not much cooler it is, at least, easy to launder. I wear a doublet of sturdy, unbleached muslin, cut by the same pattern as the cotehardie worn over it, but shorter, to hold the padding in place and to which I can tie my bias cut cloth hose. If you wish to fit your cotehardie with the fashionably exaggerated chest of the second half of the fourteenth century make the doublet first and work out the exact shape of the front and amount of padding over which you will be fitting your outer garment.
In practice, although the pattern looks complicated, drafting this type of sleeve is very simple. Start with a fitted body pattern, drafted or draped, and add whatever chest shaping and skirts you require. The armhole is enlarged by a consistent measurement (say, four inches) all the way around (fig. 6). The lower sleeve is cut to suit the shape required and fit the arm of the wearer (fig. 7). The rest is just the bit that fills in. Start by measuring both the armhole edges of the body and the top edge of the lower arm segment. Measure the wearer’s sleeve length as is done for a man’s shirt (i.e. from the nape of the neck to the wrist with the arm held up to the level of the shoulder and bent forward at the elbow). Deduct the center back-to-armhole measure of the coat back and the wrist-to-elbow measure of the lower sleeve from the total sleeve length. This is the length of your upper arm section (fig. 8). The width is the same as the top edge of the lower sleeve. Divide the width into quarters. The first quarter (A) marks the top of the sleeve. At the second and third quarters (B) and (C), mark slashes four inches deep (the same amount as you reduced the armhole of the body). Gussets inserted here and in the seam which runs down the back of the arm spread the top edge of the sleeve to fill in the armhole (fig 9). To draw the gussets, measure the top edge of the sleeve and subtract that measurement from the size of the armhole. Divide the remainder into three. The gussets at (B) and (C) are four inches high by the required width and taper to a point. The gusset in the back sleeve seam is the same width as the others but is usually longer (between two thirds and three quarters of the length of the upper sleeve) to give the sleeve a comfortable taper over the biceps (fig 10). The top edge of all of these pieces require to be gently curved to match the armhole and must be matched so that when assembled they form a smooth line. This is done approximately when the paper pattern is cut and adjusted to perfection at fitting.
This pattern will give you the same shape as the original pourpoint and will cut with a minimum of fabric waste. Seams and gussets can be moved and/or cut in more or less pieces as required to suit your particular fabric and design requirements. You will notice that in figure 2, the upper sleeve is cut in two pieces and part of the gusset allowance is added into the seams. This has more to do with fitting the pattern pieces on the original silk fabric than being an integral part of the design. The fullness still falls at the back seam, the front armhole and the underarm.
Once a garment with this type of sleeve is made up and put on, the wearer will find a bulky fold of fabric in each armpit. Get used to it. If you put on a mundane suit coat , the armhole is large and roomy. It feels good but just try lifting your arm. The entire coat rides up by several inches. If your hose were tied to the bottom of it your arms would be immobilized. That extra fabric under the arms is the allowance you need to be able to swing your arms up. A misconception among inexperienced fitters is that a loose armhole allows greater freedom of movement. In fact, the opposite is true. The smaller and higher the armhole is positioned, the higher it is possible to lift the arms without causing the rest of the garment to pull up.
Any garment this complex needs to be cut out and fitted at least once in some fabric that can be wasted. Transfer all alterations to the paper pattern at once. Use something of a weight similar to what you will use for the finished garment. Padding takes up a suprising amount of room and a try-on that fits perfectly in muslin can become unwearable in quilted silk. Believe me, I know. I watch for quilted bedspreads and old blankets at my local thrift shop where they sell the really battered and ugly ones for fifty cents to be used as dog bedding. Ask around, you may find, and be able to put to good use something that would otherwise be thrown out. Even with many years experience as a professional cutter, I would not cut into anything valuable until I had the pattern for this type of sleeve adjusted to perfection.
The Figures
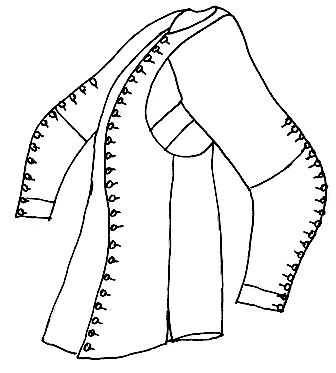
Figure 1. The pourpoint of Charles of Blois, c. 1367. Ivory silk brocaded in gold with a pattern of lions and eagles alternating in octagons. Lined with fine linen canvas. Interlined with cotton wadding quilted to both fabrics in horizontal rows 1.5 inches apart. (Musee de Tissus, Lyons)
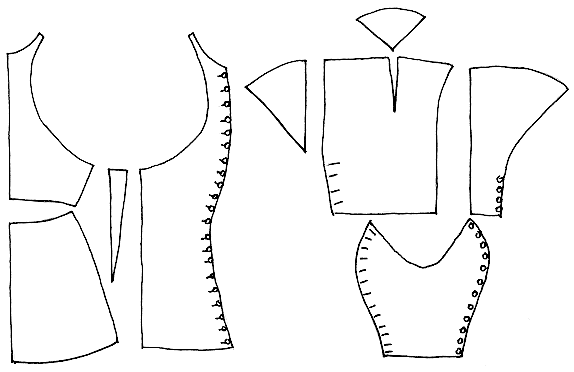
Figure 2. Pattern of the pourpoint of Charles of Blois. Note the large armhole, shaped center front seam and gussets and gores that enlarge the top edge of the sleeve. (Payne)
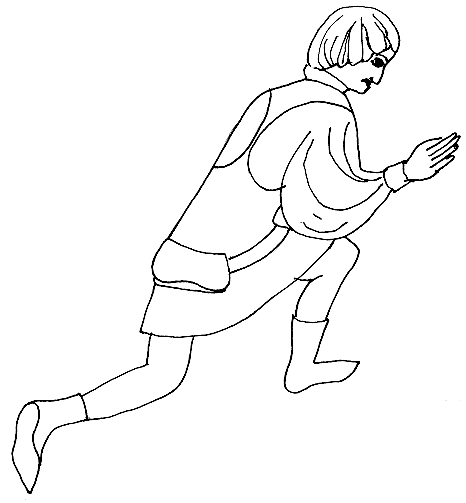
Figure 3. Figure showing the seam lines of the grand aissiette, late 14th or early 15th century. This type of garment is quite typical of the first quarter of the 15th century. (Le Livre de Chasse, MS. Fr. 616, Bibliotheque Nationale, Paris.)
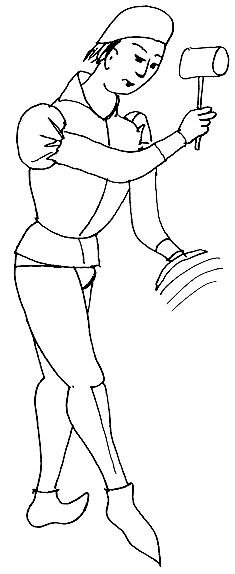
Figure 4. Figure showing the puffed upper sleeve that replaced the smooth-fitting grand aissiette and created the square shoulder line of the mid 15th century. (Heures de la Duchesse de Bourgogne, Ms. 1362, Musee Conde, Chantilly.)
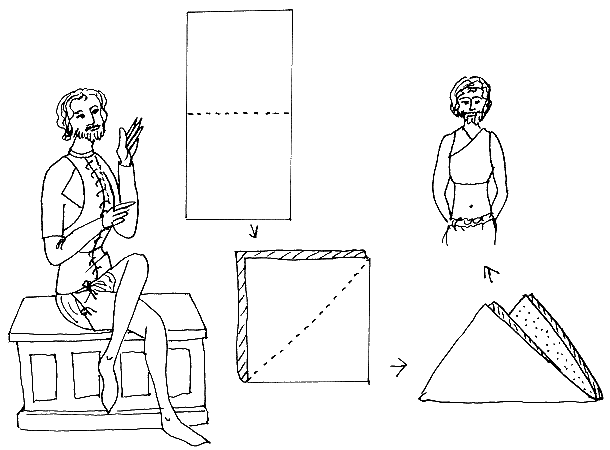
Figure 5. The bulbous chest fashionable in the 14th century was, as far as we know, the result of layers of padding stitched into the doublet. I have discovered however, that a rectangle of bulky fabric (quilting or medium weight terry toweling) about 24″ by 40″ will produce just the right shape when folded twice and placed over the chest inside a shaped doublet. Make the first fold width wise, then fold diagonally, mismatching the corners by several inches. This is placed over the chest with the double points on either side of the neck and the ends wrapped around under the arms. I’m not tossing out my hand quilted doublets quite yet, but when the temperature climbs or I’m at a camping event this arrangement makes providing myself with changes of fresh clothing much less time consuming.
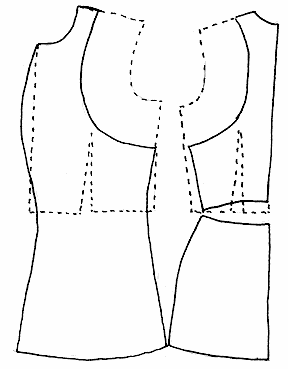
Figure 6. Pattern of body. The darts are eliminated by deducting their measurement from the front and sides of the pattern pieces and the center front seam is curved outward to accommodate the padding typical of this style. The waist is tightly fitted. The effect is to look very sleek, but the actual purpose is to help prevent the garment from riding up over the ribcage when the arms are lifted.
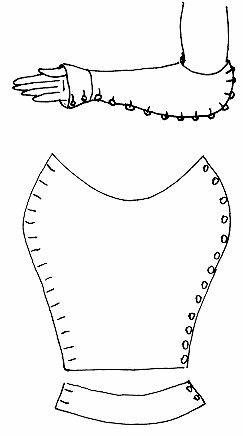
Figure 7. Lower sleeve pattern. Either draft this shape using direct measurements or drape a muslin pattern over the arm, using the method you are most comfortable with. See that the outside edges are long enough to reach from the wrist to the seam above the elbow when the arm is bent at a 90 degree angle. If you require the sleeve to fit down over the hand, either extend the length, flaring the edges below the wrist or cut a separate cuff with an outward curve and seam it in place. The latter gives the smoothest fit.
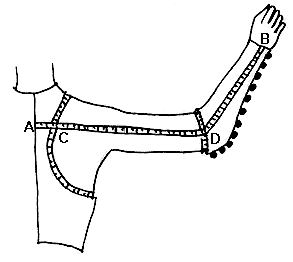
Figure 8. To find the length of the upper sleeve, measure from the center back (A) to the wrist (B). Deduct the pattern width at center back, (A to C) and the length of the lower sleeve (B to D).
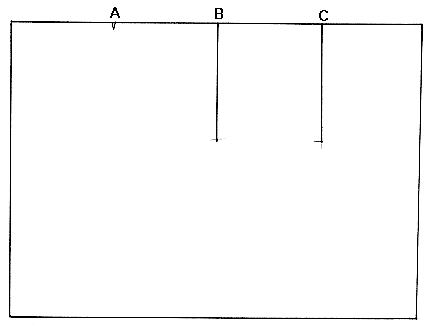
Figure 9. Upper sleeve pattern. The width is the same as the top edge of the lower sleeve. Divide the width into quarters. The first quarter (A) marks the top of the sleeve. At the second and third quarters (B) and (C), mark slashes four inches deep (the same amount as you reduced the armhole of the body). Gussets inserted here and in the seam which runs down the back of the arm spread the top edge of the sleeve to fill the armhole.
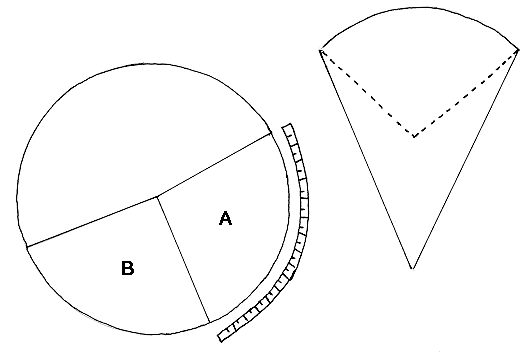
Figure 10. Gussets. Draw a circle with the same radius as the depth of your gusset slashes in Fig 9. Cut three wedges from the circle, measuring along the outer curve one third of the difference between the armhole measure and the top edge of the upper sleeve for each one. Two of the wedges will serve as gussets B and C. The third is lengthened to between two thirds and three quarters of the length of the upper sleeve for the gusset inserted into the back sleeve seam. The side edges of this gusset can be curved in slightly to produce a more graceful taper to the sleeve. Decide this at fitting.
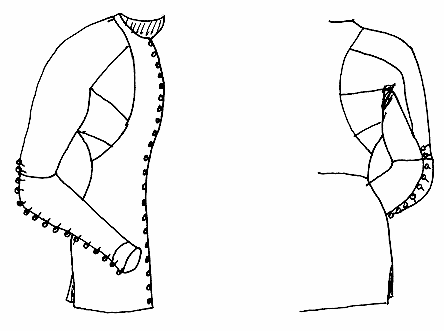
Figure 11. The assembled sleeve, front and back. Set the sleeve smoothly into the armhole at the fitting. The armhole seam should lie smoothly over the back and chest in a graceful curve. Mark carefully and transfer all alterations to the paper pattern at once.
Bibliography
Bishop, Morris. The Horizon Book of the Middle Ages. Boston, 1968
Newton, Stella Mary. Fashion in the Age of the Black Prince. Boydell Press, n.d.
Payne, Blanch. History of Costume. New York, 1965
